
To ensure the quality of our iOS Apps during development and testing, we decide to use Jenkins jobs to test it on WeTest cloud devices for every update of our app. After investigating various tools, we use gtest + gmock as the unit test framework and Appium as the UI test framework for the SDK.
We describe the Appium solution below, including Appium mechanism, steps to setup Appium locally and integrating our tests into Jenkins jobs. Setting up Appium locally is just for running and checking test cases, while the Jenkins job with the WeTest Automated Test Plugin are triggered to start automation test on WeTest cloud mobile devices for each release during the whole development lifecycle.
1. Appium Mechanism
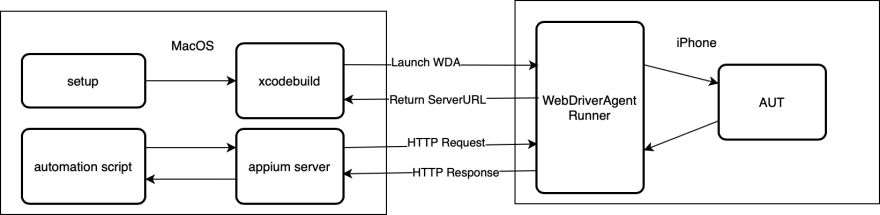
This is a typical Client-Server architecture. XCode or xcodebuild command installs and launches WebDriverAgentRunner app in the iOS device. This app accepts HTTP command, parse it and call underlying XCTest.framework interfaces to control the app under test.
Automation script was written in Python or Java.
WebDriverAgentRunner is the command server accepting HTTP commands and the target app of WebDriverAgent that is an open-source iOS automation tool originally developed by Facebook and now maintained by Appium.
Appium server is a bridge accepts automation script requests and then call related WebDriverAgent HTTP commands.
XCTest.framework – It is an Apple official iOS framework provides interfaces to interact with app UI.
2. Setting up Local Appium Test Environment
OS: MacOS
Dev Env: XCode, Command Line Tools, python, pip, HomeBrew, node , npm, libimobiledevice tools
Install all dev env dependencies.
- XCode can be installed via Mac AppStore or downloaded here
- Command Line Tools can be downloaded here
- Homebrew
ruby -e "$(curl -fsSL

            https://raw.githubusercontent.com/Homebrew/install/master/install

        )"
- node and npm
brew install node
node -v  # verify node version
npm -v   # verify npm version
- Appium can be installed via Appium Desktop ( releases page ) or via npm. We use the latter one
#npm config set proxy "http://<proxyip>:<proxyport>"  # in case proxy is required
npm install appium@latest -g
npm install appium-doctor -g
appium -v # verify appium version
- libimobiledevice tools
brew install libimobiledevice
So far, all dependencies have been installed. We can run appium-doctor –ios to verify the Appium installation. Appium doctor would check multiple dependencies. Only the “necessary dependencies” are needed, so we ignore the optional dependencies currently.
3. Debugging on the Device
WebDriverAgentRunner is a controlling app running in the iOS device. Appium have already integrated it into its installation folder. We can launch WebDriverAgent.xcodeproj in the following path:
/usr/local/lib/node_modules/appium/node_modules/appium-webdriveragent/WebDriverAgent.xcodeproj
Then, we change WebDriverAgentLib and WebDriverAgentRunner to “Automatically manage signing” as the screenshot below
1) Launch WebDriverAgent.xcodeproj project in XCode
2) Click WebDriverAgent project name as shown in the upper left rectangle of the following screenshot
3) Click the “Signing & Capabilities” tab
4) Switch to target WebDriverAgentLib and click “Automatically manage signing”. Choose a developer team name in the “Team” select box.
5) Switch to target WebDriverAgentRunner and click “Automatically manage signing”. Choose a developer team name in the “Team” select box.

Select the Target as WebDriverAgentRunner and Select a target device. Then, launch it from Xcode menu item “Product / Test”

Xcode Console will print messages when running. You might enable it from menu item “View / Debug Area / Activate Console”

When ServerURLHere is shown, the WebDriverAgentRunner is succesfully launched and waiting for commands over HTTP.
Then, stop the running WebDriverAgent project and close XCode completely. Appium will internally handle to launch the WebDriverAgentRunner automatically.
Start Appium – Just run ‘appium’ in the Terminal.

Run a simple test script
# -*-
coding: UTF-8 -*-

import unittest
import xmlrunner as xmlrunner

from appium
import webdriver
class SimpleAppiumTest(unittest.TestCase):
def setUp(self):
print('handle driver set up .')
desired_caps = {
'platformName':
'iOS',
'automationName':
'XCUITest',
'deviceName':‘iOS’,
'newCommandTimeout': 600,
'bundleId': 'com.apple.mobiletimer',
'udid': 'fd3b34c2a7ed5a724168d3af98f694315f3e8611', # remove this line when running on WeTest
'webviewConnectTimeout': 10000,
# Following is required when running on WeTest
# 'udid': os.getenv("IOS_SERIAL"),
# 'webDriverAgentUrl': "http://%s:%s/" % (os.getenv("WDA_SERVER_IP"), os.getenv("WDA_SERVER_PORT")),
}
self.driver = webdriver.Remote("http://localhost:4723/wd/hub", desired_caps)
def tearDown(self):
print('tear down')
self.driver.quit()
def test_open_alarm(self):
print('Clicking Alarm tab')
self.driver.launch_app()
self.driver.find_element_by_name("Alarm").click()
if __name__ == '__main__':

unittest.main(testRunner=xmlrunner.XMLTestRunner(output="output"))
# output=os.getenv("UPLOADDIR") is required when running on WeTest
4. Jenkins – Submitting Test Tasks to WeTest Device Cloud
**WeTest Automated Test Plugin**
Follow the steps here to install and configure the WeTest Jenkins plugin.
**Prepare the Appium automated test scrip**
WeTest provides an sample script in the Github repository.
We follow the sample script to create our test script zip package by running the create-zip.sh. Then, we renamed the zip file to “ArchiveTestAppiumDemo1.zip” as shown in screenshot below.
Please note that there is a line “mv $UPLOADDIR/TEST-*.xml $UPLOADDIR/TEST-ALL.xml” in the runTest.sh is needed for generating the TEST-ALL.xml result file, which WeTest leveraging it to generate the Report Analysis.
**Submit test tasks to WeTest**
We configure the Build section and set ipa file path and script zip file path to Plugin settings. The paths must be absolute paths. Device groups can be manually configured. Tests would run in parallel in those devices in the selected device group.

Click “Build Now” of the job and and view result report URL from the Console Output

5. Retrieving the Test Result and Analysis
**View Reports**
All test analysis in one view. Go to Test Analysis and get the test report.

Exporting Appium Script Output
WeTest provides either download script log from the page. Or, retrieve it from the REST API “Get Results of Devices in Test”
We try to call (replace <SecreId>:<SecretKey> with the secret id and secret key got from the [Account Settings page](https://console.wetest.net/account/base/))
![]()
Then it would return the JSON result with “script_log_url”. “script_log_url” is a link to the logs zip file. Download it and unzip it, the Appium script output (filename: runTest.log) along with other logs reside in it.
Summary
WeTest provides maximum mobile device coverage and an easy way to automate Appium test using powerful REST APIs and Jenkins plugin. We can integrate it with other CI/CD system. Due to ease of running tests in parallel on WeTest, we can increase quality and velocity with the cloud-based digital quality platform in the whole development lifecycle.
Visit [WeTest Automation for more information.