Or How a journey to Florence can help you to understand models for testing.
During my work on a program to demonstrate how Model Based Testing in test automation works, I was also planning my holidays to Florence. And it occurred to me that working on the holidays plan had a lot in common with developing models for tests. That triggered the idea to see if all the elements from a test model could be matched with similar events in a holidays. I saw a lot of similarities. My “things to do list” for example matches “the things to test”. Let’s stop for a coffee brake is similar to closing the browser in the middle of a transaction. And then the idea came to me that it could be of help to use the holiday experiences to teach and explain the working of models for tests. And after a few more “discoveries” I thought it might be a good idea to share this with the test community. And the result is this blog.
In this blog I present a way to help you develop models for testing. Test models are at the core of test automation. This is called Model Based Testing (MBT). Model Based Testing is being used more and more. In MBT a model is designed to determine the test steps and test data. From that model the test scripts are generated automatically which of course is a big advantage: It is quick, reliable and it saves the tester a lot of tedious work. Also when things change, the scripts can become “up to date” by one click of a mouse. This produces the test scripts much quicker after a change and is – in contrary to changing all the scripts by hand – less error prone. As such this makes Model Based Testing a quick win for Agile and Scrum development teams.
However, the downside of MBT is that it often demands for highly skilled testers. They must be able to think in abstract models and learn a new modelling language. And on top of that the commercial tools available today are pricey.
So the question is: “Can we learn test modelling, without a timely investment in some new modelling language and costly test tools?”
Yes we can; this blog will show an innovative and original approach to designing models for testing. To show how easy it is to make good test models I use the metaphor of a journey to Florence to explain all the ins and outs of test modelling.
After this blog you will be able to use your common holiday experience to build better models for testing. Let’s give you a quick idea what we are going to do:
In a moment I will show that: “what do we want to see in Florence?” is similar to “what do you want to test”. And the activity of marking the interesting sites on a map is similar to the use of state variables in a model. Here is the complete list:
|
Journey issues Model issues – What do we want to do in Florence? what do we need to test – Where are we going to states – How do we get there transitions – What did you see expressions – Not again … ,please! guards and conditions – Who wants to go to Pisa? sub models – Let’s find a place to lunch group events Where shall we meet? |
The type of models I use for testing are State transition diagrams. I will introduce this type of diagrams along the way. So just sit tight and … take off to Florence
Let’s go to Florence
Before going on a journey I like to read some travel guides and Google what I might want to see. This results in a list of ideas. Sometimes you will find lists on the internet as well, like: must see in Florence, most popular sites in Florence, etc.. The next step is to find those places on the map and find hotels and transportation nearby. I show you my “things to do” for Florence and a part of the map with a possible route.
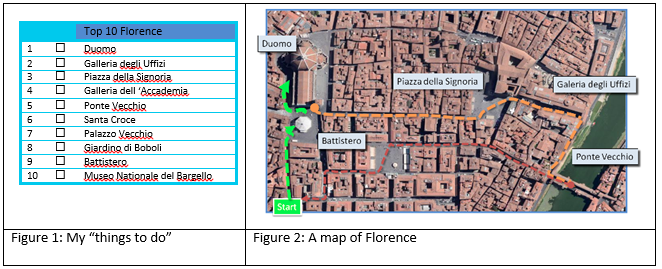
The list and the map describe what we want to do in Florence. With a little abstraction you see that we have places to go to like The Battistero, we can climb the Duomo, see the Piazza della Signoria with the famous statue of David by Michelangelo, and of course the well-known Ponte Vecchio. In modeling we call these places States. On the map I have also lookup how I can get from the Duomo to the Ponte Vecchio. In modeling we call this travelling from one state to the other a transition. In modeling states are drawn as rectangles and transitions as arrows. Along the arrows we describe the action this for this transition. See the examples in figure 3: “Walk to the Duomo”. If we abstract a little from the map and arrange the elements, we get our model for our journey.
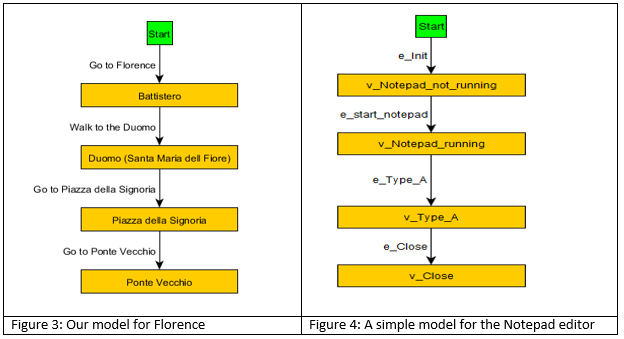
In preparing test models we start with a list of the things we may need to test and a map of the application. In this map we show the screens and how they are connected. For a simple Notepad test the map can be like the one in figure 4. As you can see: the map of the journey and this Notepad map look the same.
Is it a state or a transition?
A few notes on states and transitions. In our journey from the Duomo to the Ponte Vecchio we walk across the square Piazza della Signoria. If we only walk across this square and in passing look at the statue of David by Michelangelo than you can argue that it is a transition. Then it is in fact part of the transition from Duomo to Ponte Vecchio and should be not in the model. A state is a place where we go to see things, a transition is a road to get to the next place. There is no wrong or right answer to this question. If you want to use this place as a state, you are welcome. Maybe in enlarging this model you will add more transitions to this state, for example to go to the Santa Croce. Then it is a good idea to add this piazza as a state. If you do not plan to visit this piazza, then it can also be eliminated from the model. This illustrates the idea that states can always be added by splitting a transition, or states can be removed from a model by connecting the transition in and out of that state in new ones. To be complete every incoming transition must be connected to every outgoing transition. But since you’re the designer of the model, you can make a test model that fits your interests.
Duomo … done!
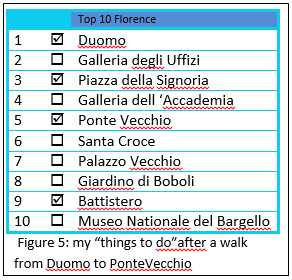
I always check the places that I visited. So during the journey the “things to do” list gets more places checked. After our little tour from the Duomo to the Ponte Vecchio in Florence our initial “things to do” list will be as in the list in figure 5.
In the test model we want to do the same: record what has been done. We can do this by introducing so called state variables. Let me show you how this is done. Every state is given a so called state variable. In fact a sort name, sometimes called an acronym. We are free to choose what suits us best.
For the Duomo we could name the variable “D” or “Dome” or “Duomo”. To record that we climbed the Duomo we could assign the value: “Climbed”. In order to distinct between “not climbed” and “climbed” we start the model with a value “not Climbed” for the Duomo. In short we note this down in our model as follows: duomo = notClimbed or duomo = climbed.
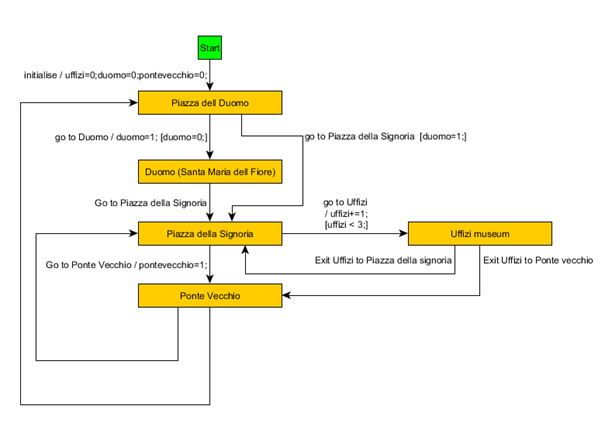
In the same way we could give names to the other states and change the assigned value with values like: PonteVecchio = “notVisited”; PonteVecchio = “visited”; Uffizi= “notEntered”; Uffizi = “Entered”.
The expressions are noted in our test model after the transition label and start with a “/” as follows:
Goto Duomo / Duomo = “climbed”;
After the introduction of these variables we could ask the model: Have I visited the Duomo? And the answer would by either: “notClimbed” or “Climbed”. If I asked this question to my partner she would normally answer with “Yes” or “No”, depending on whether we climbed the dome or not. In modeling you can choose your own type of values. Sometimes it is handy to record the number of times you visited the places of interest. At the start of the model all place-variables are set to 0(zero) and after visiting a place we set the number of visits to 1. See also the model at the end of this blog.
Start / Duomo = 0; Battistero = 0; Pontvecchio = 0;
Goto Ponte Vecchio / PonteVecchio = 1;
We can use state variables for all different kinds of situations. If you want to keep a budget, variables could help. If you want to keep a time plan, variables can just do that for you. I model the change in state variables on the transition into the state. One could also choose to do this at the outgoing transition(s).
Not again … , please!
Picture this situation. The next day in Florence you start at the Piazza dell Duomo. And your partner wants to go to the Ponte Vecchio again because she saw this little necklace and wants to buy it. You might reply: “Hé, we went there yesterday!” Let’s go someplace else!” So what you say is in fact that this transition from the Piazza dell Duomo is not acceptable today. It might be the other way around if you want to climb the Dome again, because yesterday the weather was not good, and today there is a bright blue ski.
The thing I want to point out is that at times a transition is acceptable while at some other time it is not. We can model this type of behavior by use of so called guards. The guards allow us to take the transition or not. Guards are modeled by means of Boolean expression. These Boolean expressions are evaluated and are either true or false. If the expression is true, the transition can be used, you may pass. And if the expression evaluates to false, the passage is not allowed.
The guards are noted in our test model by Boolean expression in between [ and ].
In the same way as expressions, guards are added to the label of a transition (Note that a guard added to a state would not make sense, because than the transition was allowed, but the state was not allowed). In other words you can only reach a state if at least one of the transitions to that state are allowed. If there are no guards the transition is always allowed.
The example of a guard for the transition to the Ponte Vecchio could be noted down as follows:
Go to Ponte Vecchio [PontVecchio = 0]
In words: the transition to the Ponte Vecchio is allowed if and only if the variable PonteVecchio has a value of zero.
In combination with the expression – as explained earlier – PonteVecchio = 1 we get this transition:
Go to Ponte Vecchio [PontVecchio = 0;]/ PonteVecchio = 1;
The guards are first evaluated and then the expression. Otherwise this would be a transition that would always be blocked. Guards must be on the incoming transition. Otherwise one could end up in a state that has permitted outgoing transfers: a so called deadlock situation. The test execution and/or test generation would then stop.
There are many ways to formulate guards and use variables. Here is another example: The tourist guide advices you that the Uffizi museum is large and holds so many works of art that it is impossible to see it all in a single day. You may want to visit het Ufiize twice, but that is the limit. The transition for the situation described above is as follows:
Go to Uffizi [ uffizi < 3] / uffizi = uffizi + 1;
The variable “uffizi” is assigned to the number of visits to this museum. The guard [ uffizi < 3] is true if the number of visits to the Uffizi museum is less than 3.
The expression Uffizi = Uffizi + 1; determines that the value assigned to Uffizi is added by one. Computer programmers like to code this also as : Uffizi += 1; In order to make this work in our model we also must assign 0 to the variable Uffizi at the first transition.
As mentioned in the previous part about variables, the budget could also be checked before we can visit a museum or other place that asks an entry fee. Only if the budget is enough to pay for the visit, the transition into the museum is valid. For the Battistero (costing € 10,00) we could configure the transition “go to the battistero” with the following guard: [(budget – 10,00) > 0;]. The complete transition description is:
Go to Battistero [(budget – 10,00) > 0; Battistero =0;]/ budget – 10,00; Battistero +=1;
The transition is valid if we never visited this Battistero and our budget holds more that € 10,00. After the transition the number of visits is 1 added; and the budget is € 10,00 subtracted.
In test models the most common situation of guards is login. Your only allowed to continue with the application if and only if the credentials are accepted. But many other situations can be modeled by guards. Are the ordered goods in the store? You can only save your car configuration if you have been registered.
Let’s go to Pisa!
So far I demonstrated that journey issues can help in designing models for testing. The next issue deals with the question if we need to model everything in advance or that we can develop our model step by step (or better state by state). When being in Florence someone comes up with a plan to go to Pisa and see the famous tower. Maybe he saw a poster, or maybe saw a train in the train station heading to Pisa. We can add the places in Pisa to our “things to do” list. Or we can make a separate plan for Pisa. And sometimes you can decide to just go there and then see what can be done (without a plan). The only thing you know is: ” we are going to Pisa”. This situation is analog to the situation that our test object can be split in modules. We can start to build a model for the first application module. Then a separate model for the second. And later on integrate these two into one. So in test modeling the trip to Pisa can be handled as a separate plan. Without any connection with our first plan. After this second plan is developed, we than can add transitions from Florence to Pisa and combine the plans into one. It is also possible to make a state “Pisa”, but design no details at first. Of course we need to add also a transition to Pisa and one back to Florence. Or in our test model make a reference to the second module, but model no details.
What Model to Use for Testing?
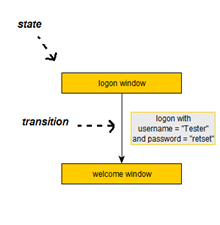
like to use state transition models for all my testing. Firstly because I like to present information in drawing – yes I use mindmaps a lot. And state transition diagrams reflect the way we think about applications. Not everyone will agree on this, so let me explore the idea a bit further. Testing an application is – in my view – always split in three parts: what is on the (computer) screen (where are we?). Which action is required (where can we go?). Which information is needed to have success? If you want to start the application you have to click on an icon. No information is needed. If you need to logon. Then the logon window must be visible. You have to type in your user name and password and then click “logon”. If you are a tester than you know this is all we do. In terms of states and transitions: the states are the situations on the screen we see. If we do nothing, the screen will not change. If we want to get some response we need to do something. From the application not started to the application started we need to click its icon. To login we need to type our credentials and click “logon”. These changes are called transitions. The computer changes from situation 1 – not logged on – to situation 2: logged on.
A state transition model is represented by a drawing. There are other methods to represent state transition models like tables. As mentioned before I like to draw. The states are represented as rectangles. And the transitions are represented by arrows, pointing from one state to the other state. The arrows are labeled. On the label is the action to perform. The arrows are always from one state to another. And never both ways. If you can go from one state to another and back, than I use two arrows. (see figure 6)
At this point I will not write about all the things you can use in such a model: the theory. There are many books and other sources to help you with this.
How do you use a state transition model for test script generation?
I will describe here in short how state transitions models are used for test script generation. The start of the test is where the model has a state called “start”. From the start you follow any arrow. If there is only one, that is the transfer. If there are more than one: choose one. Then follow the instructions that are labeled along the transition. For example a logon transition determines the username and password and the action needed to send these entries to the computer for validation. The end of the arrow points at the state we will arrive after the transition is completed. And from here the routine continues in the same way. Find the outgoing transitions; choose one; enter the information and perform the action. This will bring you to the next state. Remember our remarks about guards. When you choose a transition, you must of course determine which transitions are allowed. During the transition you have to execute the expressions. In other words update the values of the variables in accordance to the expressions that are labeled along the transitions. Of course if you use a tool for generating test scripts from models this will be done by the tool.
In conclusion
This ends our little journey to Florence. In this blog I showed that there are many similarities between a trip to Florence and test modeling. And also that expressing a test situation in terms of a journey can help to find a good test solution.
If you want to experiment I recommend this editor for drawing state transition diagrams: yED by Yworks. If you want to experiment with model based testing tools, there are some available as open source like here and Graphwalker. Let me know if you liked this blog and if it helped you to build better models for testing. Maybe you yourself discovered other similarities and maybe you like to share these with our test community at EuroSTAR. Here are some more ideas to explore.
– group events (similar to: Let’s find a place to lunch),
– Synchronization and communication (similar to: Where shall we meet?).
Part of the model for Florence illustrating the use of state variables and guards.
